CYCLOPS Setup
CYCLOPS is a small-field IFU fibre-feed Anglo-Australian Telescope's UCLES coude-echelle spectrograph.
This page provides notes on how to prepare CYCLOPS for observing
-
1. For AAO Support staff at the start if a run
-
2. For Astronomers at the start of a Planet Search run
-
3. For Astronomers start of each night.
Those interested in more background information on CYCLOPS should consult the main CYCLOPS web page.
CYCLOPS IN BRIEF
IFU: 15 x 0.6" close-packed hexagons, equivalent to a 2.45" diameter aperture (ie. 4.7 asec2) on sky.
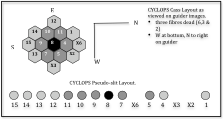
PSEDUO-SLIT: 0.63"x14"
λ/Δλ RESN: 70,000
LINKS
-
•CYCLOPS News - with updates from commissioning runs.

Page prepared by Chris Tinney,
CYCLOPS Project Scientist.
Last updated 18 July 2023.
1. CYCLOPS Install Notes for AAT Day-crew
-
-
1.Install f/8 top-end
... following the usual AAT procedures for installing the f/8 top end
-
-
2.Install CYCLOPS Cassegrain unit at Cassegrain focus
-
•Mount CYCLOPS unit at the Cass focus, with the Cass A&G unit rotated to 0 degrees.
-
•Insert list of all the units and cables to be connected here. Basically fill in an AAT Technician check list.
-
•Disable Cass A&G Unit rotation
-
•Connect the CYCLOPS fibre bundle head into the CYCLOPS Cass Unit - making sure to remove the fibre head unit plastic cover (if present)!
-
•Make sure the EE laptop is connected to the ethernet and powered up and running.
-
3.Start up & Check operation of CYCLOPS Guider
-
•Start up the CYCLOPS Apogee guider camera with
Start->GUIDER->CYCLOPS Guider
If there is already a guider window running, this will shut down that guider task and start a new one talking to the CYCLOPS Apogee camera via the cyclops EE laptop -
•In the GUIDER GUI use
'Commands->Initialise/Reset Apogee Interline' to initialise the system
'Commands->Imager' to display a GAIA window. -
•Take a test image and verify it is working - the test image should be 600 pix x 600 pix in size
-
4.Installation of Fibre Slit Unit in Pre-slit area
-
•Make sure the Exposure Meter rotating mirror power supply is turned on and set to 1.6v.
-
•Disable the beam rotator using the manual 'cut-out' switch, and move the beam rotator to the furthest extent of its travel.
-
•Set the Mirror Slide to "Manual" using its over-ride switch, and manually drive it out of the way (to the furthest extent of its travel).
-
•CAREFULLY sit the Fibre Slit unit onto the three balls of its kinematic mount. This is quite fiddly, as you have to guide the fibre head and the slit unit between the rails on which the UCLES Pre-slit beam rotator and mirror slide move.
-
•Adjust (if necessary) the fibre vibrator 'hanger' arrangement so that the fibre travels smoothly from the back of the pre-slit unit to the location where it enters the pre-slit area.
-
5.Balance the Telescope
-
•Using the usual procedure. For reference the CYCLOPS top-end focus position is near 25.60mm
-
6.Start the UCLES and CYCLOPS software
-
•Login into the usual computer used for UCLES observing, then type (as at Jan 2011)
-
% drama -v ucles_cyclops_latest
-
-
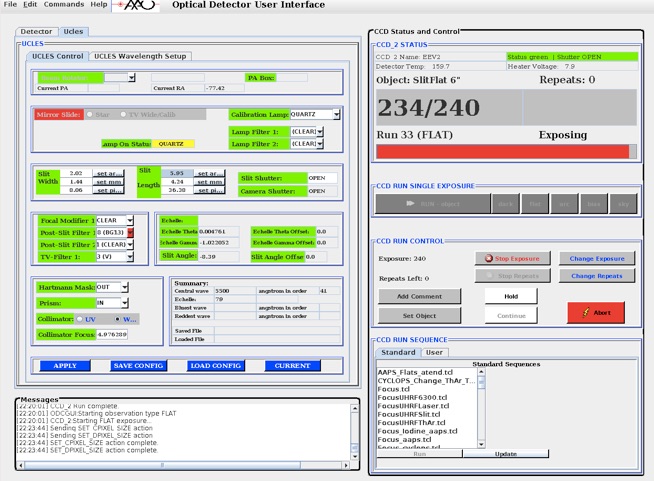
•Start the UCLES/CYCLOPS ODC interface by typing
% cyclops1 cyclops_em cyclops_guider (for CCD1)
or
% cyclops2 cyclops_em cyclops_guider (for CCD2).
If you get errors saying that 'CYCLOPS Tags' can't be obtained from the 'PAC' then it is likely the PLC that runs the CYCLOPSCALIB task has managed to get turned off, and has lost all its firmware. Call a technician and they will get someone from Epping to fix it. -
•Once that system has started up, open the the CYCLOPS calibration gui by typing

% newcyclopsgui
which should make the GUI shown to the right appear
-
•Using this GUI, turn the vibrator on and leave it on for the rest of the run..
-
•Also use the 'Commands->CHange Timeouts' menuitem to produce a pop-up that allows you to change the ThAr timeout. The default value of this is 120s which is just too small to be useful. Increase it to 1800s.
-
•Finally, if the observers will be using the SuperAAPS observing system it is probably worth starting that as well (its the easiest way to take test data to verify the system is running)
% cd saaps
% saaps &
-
•NB: Shut down / Restart - If the CYCLOPS system is running and you need to shut it down, then follow the usual process for UCLES observing.
-
•First, try to shut things down from the CCD Loader window using the "Commands->Exit" menu item. If you do this during your run, make sure to NOT park the echelles!
-
•If that doesn't work then type 'cleanup' in the window that you started the gui interfaces from.
-
•If after doing that you still can't restart the interfaces, then do the cleanup again, and then reset aatvme15, wait a few minutes, then restart the software. (If you don't know how to reset aatvme15, then call for the afternoon technician or night assistant at this point).
2. CYCLOPS Set-up at Start of Run for Astronomers
NB: The following notes assume you will be doing planet search observing - they are generally applicable however. The only thing that's different for another program is the wavelength-setup and rotation process, where it will usually be adequate to use the UCLES ODC system to select a central wavelength. You will get an approximate wavelength configuration that is pretty good using the usual UCLES commands to move the 79l/mm echelle to a stated central wavelength. (Only the most anal retentive programs - like planet search work - require adjustment to a previous alignment to within a pixel).
-
1.Make sure the Exposure Meter rotating mirror power supply is turned on and set to 1.6v!
-
2.Start the CYCLOPS Guider (if not already running).
-
•On the night assistant's left hand display, start up the CYCLOPS Apogee guider camera with
(If you are not comfortable with doing this then call for the day-crew/afternoon technician to do it for you)....
Start (the menu on the bottom left of the window)->GUIDER->CYCLOPS Guider
If there is already a guider window running, this will shut down that guider task and start a new one talking to the CYCLOPS Apogee camera via the cyclops EE laptop -
•In the GUIDER GUI use
'Commands->Initialise/Reset Apogee Interline' to initialise the system
'Commands->Imager' to display a GAIA window. -
•Take a test image (ie set time to 1s and click 'Take an Image' button) and verify it is working - the test image should be 600 pix x 600 pix in size
-
3.Start the UCLES and CYCLOPS software
-
If the UCLES and CYCLOPS GUIs have not already been started (or if they have been started without the guider or exposure meter subtasks), then
-
•Login into the usual computer used for UCLES observing, then type (as at Jan 2011)
-
% drama -v ucles_cyclops_latest
-
-
•Start the UCLES/CYCLOPS ODC interface by typing

% cyclops1 cyclops_em cyclops_guider (for CCD1)
or
% cyclops2 cyclops_em cyclops_guider (for CCD2).
The first thing to appear will be the 'System Loader' (see the image to the right) which shows the various tasks being initialised and connected to.
Next you will get a pop-up asking you to set details on the date and filenames for data taken. If the instrument being used is undefined then set it to CYCLOPS.
FInally, you will see the ODC GUI, from which UCLES and CCD operations can be controlled
-
•Once that system has started up, open up the CYCLOPS calibration gui by typing
% newcyclopsgui
which should make the GUI shown to the right appear
-
•Using this GUI, turn the vibrator on and leave it on for the rest of the run.
-
•Also use the 'Commands->CHange Timeouts' menuitem to produce a pop-up that allows you to change the ThAr timeout. The default value of this is 120s which is just too small to be useful. Increase it to 1800s.
-
4.Start the SuperAAPS (saaps) software
-
•If saaps has not already been started by the day crew, then start it yourself.
% cd saaps
% saaps &
-
5.Initialise a New Log in the SuperAAPS
-
•In the saaps window use
'Observing->Initialise New Night's Observing Log'
to bring up a dialog in which you can input data on the coming night. In particular make sure you set the 'u,w,s' entry to 'c' (for CYCLOPS), and set the run number to one more than the highest run number previously used (to find out what this is use a terminal window to execute
ls ~/saaps/final_logs/c*.*.log
The numbers that come after the c, and before the '.yymmdd.log' in these files show the previously used run numbers. Pick the next one and enter it into the dialog box at 'Run Number'.
And finally, enter the date for tonight in the 'Date' box. It is very important to get this right, as this determines everything saaps assumes about where data will be found, and what to call the log files.
-
6.Change UCLES to 79l/mm echelle, set an approximate ET/EG setting
-
•Using the UCLES ODC GUI, go into the 'UCLES' tab, and then into the 'UCLES Wavelength Setup' tab.
-
•If you are doing Planet Search work
-
•Set the central wavelength to 5500 (, the echelle grating to 79l/mm, and leave the Peak and SLAUTO boxes unchecked.
-
•Click 'CONFIGURE'. UCLES will now switch to the 79l/mm echelle, and move the grating that has the 5500A order in the centre of the detector.
-
•Now we want to update ECH THETA and ECH GAMMA to values that were found on the last run for CYCLOPS Planet Search observing. So using the commands
ls ~/saaps/final_logs/c*.*.log
and
more ~/saaps/final_logs/c*.*.log
read the headers from that log file to determine those ET and EG values. For example in October 2011, we use ET=0.0048 EG=-1.0221. -
•Apply those ET, EG values by clicking on the green 'Echelle Theta / Echelle Gamma' boxes, and entering the correct value in the dialog popup that is produced, then clicking 'OK' it to make the change happen.
-
•Set the Slit Angle the same way to -8.4 degrees.
-
•Using saaps (see the SuperAAPS page for more information on running this system) load a CYCLOPS FibThArS into the queue and start it.
-
•When the exposure has finished reading out, execute the following script
AlignUCLESAAPS -C -d AlignCyclopsAAPSMASTER.fits the_file_you_just_took.fits
Usually this will look something like
AlignUCLESAAPS -C -d AlignCyclopsAAPSMASTER.fits /data/aatobs/OptDet_data/111014/ccd_2/14oct20010.fits
This script takes a few minutes to run, but will eventually tell you the detector rotation and the ET,EG shift required to move the arc lines in the latest image on top of the 'Master' image. -
•If the detector needs rotating then call for the afternoon technician and ask him to 'rotate the detector by -0.5mm' or whatever it is the script has told you. Then take another arc and check it. Usually the rotation will be fine in one go. Then it takes a few iterations with ET and EG to get them right. In general you want these adjusted so that the misalignment is less than a pixel in each direction.
-
•If you are not doing Planet Search work and want to set u some other wavelength configuration, then
-
•Go into the 'UCLES' tab, and then into the 'UCLES Wavelength Setup', and set the central wavelength to the wavelength you want your format centred on, and the echelle grating to 79l/mm. Leave the SLAUTO box unchecked. The 'Peak' box will result in UCLES trying to adjust the format so the blaze peak is centred in the middle of the detector. You may (or may not) with to use it.
-
•Click 'CONFIGURE'. UCLES will now switch to the 79l/mm echelle, and move the grating as requested.
-
•Take a Fibre ThAr and check the wavelengths you have on the detector are the ones you wanted.
-
7.Run Collimator Focus sequence and determine best CF value for this run
-
•Next we need to determine the best collimator focus for this set-up (and this temperature of the spectrograph.
-
•The easiest way to do this is to use saaps to take a 'CYCLOPS FibThArS' (ie. ThAr through the fibres with the iodine cell in the beam, which is assumed to be cold) or 'CYCLOPS FibThAr' (i.e. ThAr through the fibres without the iodine cell in the beam).
-
•Then using the CYCLOPS CALIB GUI ...
-
•Use 'Commands->Change Timeout' to change the ThAr timeout from 120s to 1800s.
-
•Click the 'ThAr' button to turn the fibre ThAr on.
-
•Then in the ODC GUI, start the Focus_cyclops.tcl sequence
-
•In the 'Sequence' box at the lower right of the ODC GUI, select the 'Focus_cyclops.tcl' entry
-
•Click the 'Run' button under the file chooser to start the sequence.
-
•A series of exposures with the focus stepped from -10 to +4 in steps of+2, then +5.
-
•When its finished, turn the ThAr lamp back off
-
•Then examine these images to determine the one with the best focus.
The best collimator focus with the iodine cell in the beam is +8.0mm higher than the best focus without the cell in the beam. So you can always adjust collimator focus from one to the other if you move from iodine planet search work, to non-iodine planet search work.
If you cannot reach the best focus in the mode you are using you may need to adjust the shimms on the detector. This is something that must be done by an AAO technician so call for some help. The two things you need to know are
-
•0.5 thousandths of an inch in shimming moves the collimator focus by 1.0mm. (yes the shims are measured in thousandths of an inch!)
-
•If the best focus is off the negative end of the collimator travel, then you need to move the detector towards the camera (i.e. decrease the thickness of the shims).
The red 'AAPS NOtes' folder has a table in it that relates shim colour to thickness, and you can use this to work out what colour shim to add/subtract/swap to move the best focus into the range of collimator travel available.
-
8.Perform Back-illumination Check of the GUIDER x,y position
-
-
This requires entering the UCLES spectrograph, and should be done in consultation with your afternoon technician.
-
-
(a) Mount one of the AAT's small LED torches on a retort stand directly in front of the UCLES prisms, such that the torch shines back at the collimator. (You should find a retort stand in the UCLES room suitable for doing this). This will direct a vaguely f/36 beam back through the UCLES shutter (which needs to be open for this to work - the easiest way to do that is start a 3 hour dummy exposure) and into the Pre-slit Unit's fibre pseudo-slit. If you put your head in front of the shutter and look back at the collimator, you should see the torch shining brightly at you.
-
-
(b) Next you need to adjust the UCLES slit, such that only the central fibre of the pseudo-slit is illuminated - set the slit to be 4.0" wide by 2.0" long and set SA=+10°.
-
-
(Some more information on this - with the slit angle in its "default" orientation for CYCLOPS of -8.4°, the UCLES slit has the centre of its motion in the "length" direction between fibres 7 and 8 on CYCLOPS. Unfortunately, you cannot make the slit short enough to illuminate only the central fibre (fibre 8). However, you can adjust the fibres that get illuminated by changing the slit length. And if you twist the slit angle, and make the slit short and narrow you can get just fibre 8 illuminated. Here is a guide to what you can do -
-
•a 2.0” long slit at SA=-8.4° illuminates fibres 9,8,7;
-
•a 4.0” long slit at SA=-8.4° illuminates fibres 10,9,8,7,6(dead);
-
•a 6.0” long slit at SA=-8.4° illuminates fibres 11,10,9,8,7,6(dead),5;
-
•a 10.0” long slit at SA=-8.4° illuminates 13,12,11,10,9,8,7,6(dead),5,4,3(dead); and,
-
•a 2.0" long slit at SA=+10.0° illuminates fibre 8 alone.
-
-
(c) You can now use the guide camera (with very short exposures of ~0.1s) to take images of the microlens array through the retroreflector - you will see a point source that corresponds to fibre 8. Use the "Pick Object" function in the Guide Camera skycat display to record the centroid of this point source. This is where the centre of the microlens array should map to on your guide camera.
This value should not move about much. It was determined to be (326.6,265.2) in May 2011, and (326.9, 265.5) in October 2011. Take a note of this value, and record it in the log. You will need to give this number to the night assistant as the 'guide position' when you start observing. -
-
Open the UCLES slit back up to SW=4", SL=14.5", SA(total)= -8.4deg. Abort the dummy exposure you started to keep the shutter open.
-
9.Start Acquiring Slit Flats Ready for Tonight's Observing
-
-
Once you have determined your instrumental configuration for the coming night, you can acquire a set of slit flats (actually you'll do this at the end of the night as well, and probably during the day on every night of the run).
-
-
This is fiddly and involves handling the pre-slit unit - do not do this if you have not been shown how to do it before. If you need to, get help from your afternoon technician and/or night assistant.
-
-
A - very, very carefully remove the Pre-slit Unit from its kinematic mounts. Once the pre-slit unit is safely out of the way you can switch the mirror control from 'Manual' to 'Normal'.
-
-
B - If you are using saaps, use the 'CYCLOPS->CYCLOPS TV_WIDE' menu item to move the mirror slide into the position that will send light from the UCLES calibration unit into the UCLES slit.
- If you are not using saaps, then you can achieve the same thing by going back to the pre-slit area, putting the mirror back in manual, and driving it so that (by eye) the mirror cover the slit. -
-
C - Acquire slit flat using the UCLES flat field lamps and a long slit, without moving the UCLES echelles. This be done with the saaps observing software (which can control the flat field lamp on UCLES as well as running CYCLOPS) using the 'SlitFlat' type of CYCLOPS calibration.
I can also be done with ODC GUI - you can turn on flat field lamp while the mirror slide is in manual mode. You may wish to narrow the slit down from the "default" 4 arcsecond width for use with CYCLOPS to something more like 1-2 arcseconds (saaps does this by itself). -
-
Acquire as many flats as you can!
-
D - Turn the UCLES flat field lamps back of. Manually drive the mirror back out of the way, and very,very,very carefully put the Pre-slit unit back.
-
3. CYCLOPS Observing
-
1.Check the fibre vibrator is turned on. Fibre vibration is controlled from the calibration GUI. The vibration should be turned on and left one for the rest of your run.
-
2.Allow the Night Assistant to do some SNAF stars if they wish to get the pointing right.
-
3.Focus the Telescope. Go to a very bright star. Start guiding. Take observations of it, and allow the saaps post-processing system to determine the seeing. You may need to adjust the pointing of the star on the IFU to get it nicely centred (the post-processing widget will provide suggestions for the changes to make to the guide camera X,Y guiding point, so as to centre the star. Then take a sequence of observations as a function of telescope top end focus, to get the best focus. In May 2011, this was 25.6mm.
-
4.Start Observing!

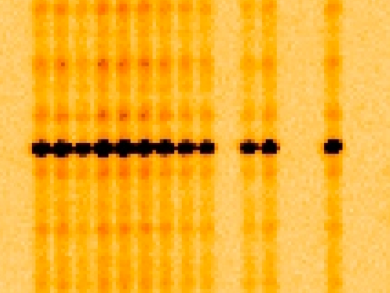
The image above shows a section of a ThAr arc spectrum obtained with CYCLOPS - each element of the IFU is recorded by UCLES as a single spectrum with spectral FWHM=2.55 pixels. In this image, three fibres are missing (fibres 2,3 and 6) producing a distinctive pattern on the spectrograph.